Guides / Measure your space
How to Measure a Pantry Before Buying Organizers
This guide is for anyone planning to buy bins, baskets, turntables, shelf risers, drawers, or other organizers for a pantry, food cabinet, or small kitchen shelf.
Why measuring only the shelf often fails
An organizer does not teleport into place. It has to pass through the pantry opening, clear the door and hinges, move around any trim, and still leave enough room for you to pull it out later.
That creates two different questions:
- Can the organizer sit in the space?
- Can it enter, leave, and work in the space?
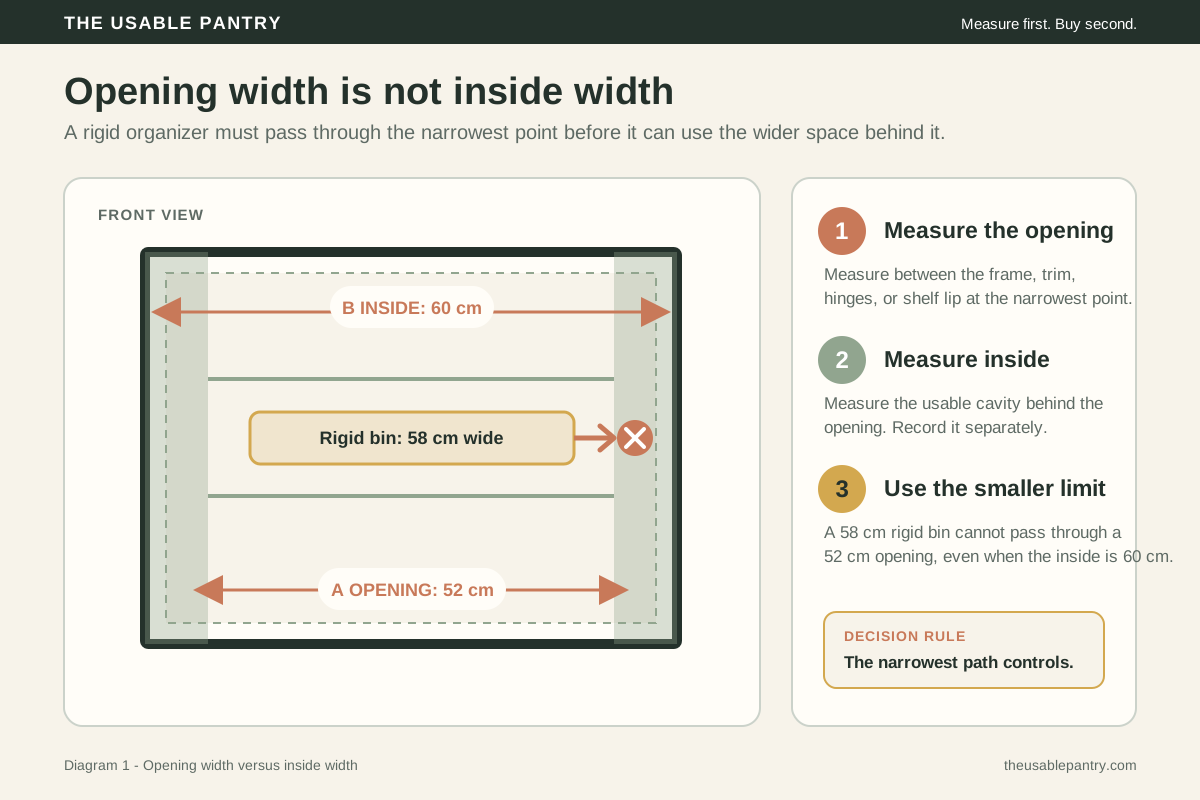
A bin can pass the first test and fail the second. For example, a rigid bin that is 58 cm wide can sit on a 60 cm shelf, but it cannot pass through a 52 cm door opening. The useful number is therefore not always the largest dimension you can see. The smallest measurement along the full path controls what fits.
 Open diagram full size
 What you need before you start
- A tape measure with a lock
- The pantry measurement worksheet, printed or opened on a device
- A pencil or erasable pen
- Your phone camera, if you want a record of hinges and obstacles
- The product's full outside dimensions, if you are checking something you already own or might buy
Use either centimeters or inches. The unit does not matter as long as every number in the comparison uses the same unit. Write the unit beside your first measurement so you do not have to remember it later.
Measure one shelf or one clearly defined zone at a time. A tall pantry can have different widths, depths, and obstacles on every shelf.
The six measurements to record
The letters below match the worksheet. When a dimension changes across the space, record the smallest useful value and note where it occurs.
A — Narrowest opening
Measure the smallest width the organizer must pass through on its way into the pantry. Check the door frame, front trim, hinges, shelf lip, and the angle at which you would insert the organizer.
For a rigid product, its relevant outside width must be smaller than this opening unless you have confirmed a different insertion angle that works in the real space. Do not assume that rotating a large product will work; the depth or height may become the blocking dimension when it turns.
B — Inside width
Measure the horizontal shelf space available where the organizer will sit. Check near the front, middle, and back because walls and cabinets are not always perfectly parallel. Shelf supports or side hardware can also reduce only part of the width.
If you plan to place several organizers side by side, calculate the combined outside width of all of them—not just one.
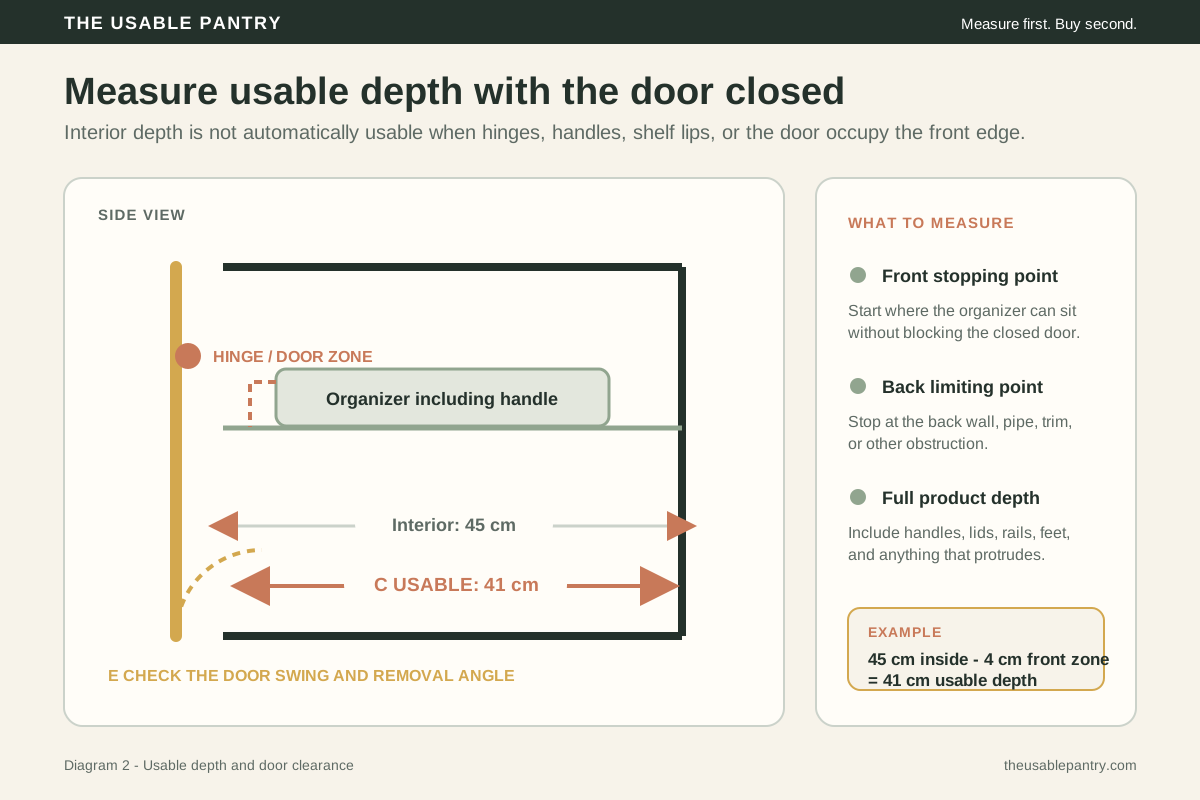
C — Usable depth with the door closed
Measure from the back wall, backsplash, or rear obstruction to the point where the organizer can extend without stopping the door from closing. Close the door gently while checking the space. A hinge, handle screw, door rack, or shelf lip may reduce the usable depth even when the empty cabinet looks deeper.
Do not count empty space that the organizer cannot occupy while the door is closed.
 Open diagram full size
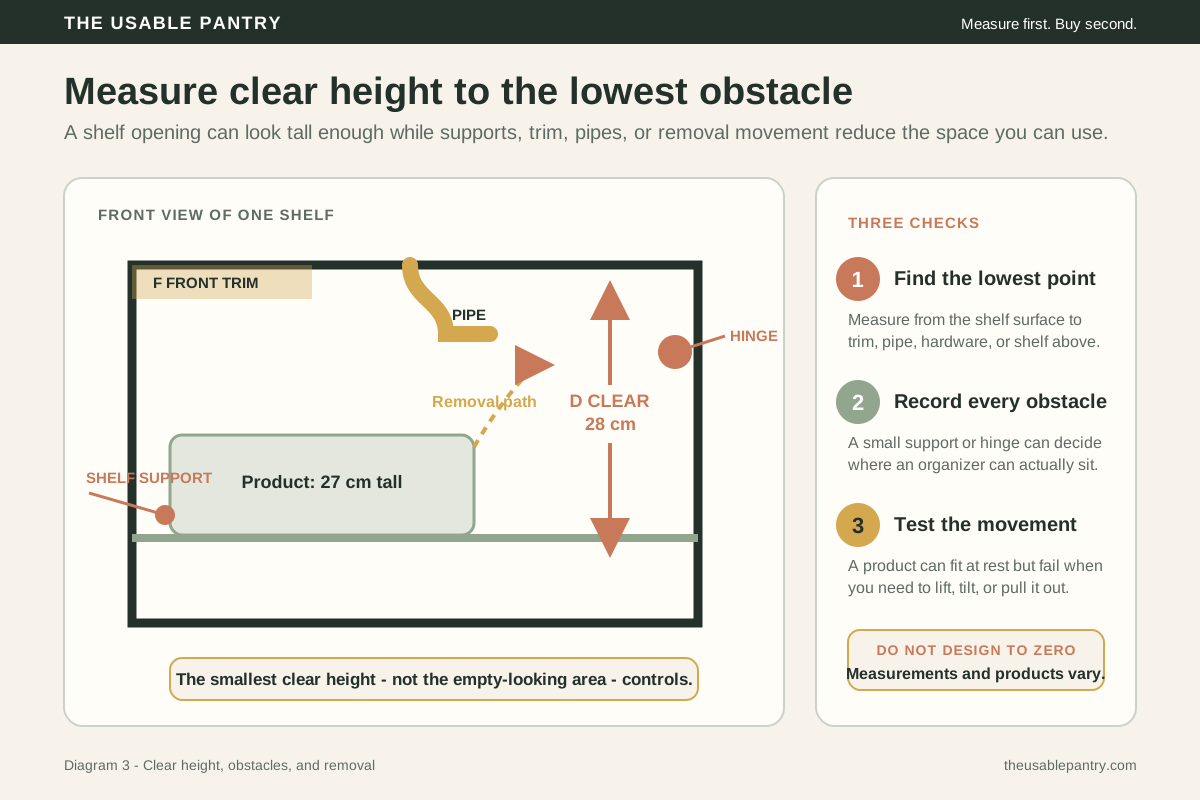
 D — Smallest clear shelf height
Measure vertically from the shelf surface to the lowest object above it. That might be the next shelf, front trim, a pipe, a light, or a support rather than the open-looking ceiling of the compartment.
Then consider how the product will be used. A bin that barely fits at rest may still need to lift or tilt before it can come out. A lidded container may need space above it for the lid to open or be removed.
E — Hinge, door, and removal clearance
Record anything that changes the entry or removal path: hinges, handles, door racks, trim, or an adjacent wall that limits how far the door opens. This is a clearance check rather than one universal number. Note the obstacle, its location, and the direction in which the organizer must move.
Test the intended movement with an empty box of similar size when possible. The test should include inserting, pulling, lifting, or turning—not only placing the object on the shelf.
F — Obstacles and irregularities
List shelf supports, pipes, outlets, bowed walls, sloped ceilings, brackets, front lips, and any other feature that occupies part of the space. Measure enough to locate each obstacle: for example, “pipe begins 18 cm from the left wall and hangs 6 cm below the shelf above.”
An obstacle does not always make the whole shelf unusable. It may instead divide the shelf into two smaller usable zones.
 Open diagram full size
 A reliable measuring sequence
Follow the same order for each shelf so that an easy-to-see number does not make you forget a hidden constraint.
- Choose the exact shelf or zone. Write its name, such as “middle shelf, right side.”
- Photograph the empty or partly cleared space. Include the door, hinges, and front frame.
- Measure A, the narrowest opening. Follow the actual route from outside the pantry to the target shelf.
- Measure B, inside width. Check the front, middle, and back; retain the smallest relevant value.
- Measure C, usable depth. Close the door and exclude the space used by hardware or door-mounted storage.
- Measure D, clear height. Check the lowest point and leave room for the motion the organizer requires.
- Record E and F. Locate hinges, supports, trim, pipes, outlets, slopes, and anything else that could collide.
- Repeat for every target shelf. Do not copy one shelf's dimensions to the others without checking.
- Measure the product. Use its greatest outside width, depth, and height, including lids, handles, feet, rails, and protruding parts.
- Run the fit checks below before buying.
Turn the measurements into a decision
| Fit check | Question | Pass condition |
|---|---|---|
| Entry | Can each rigid organizer pass through A and follow the insertion path? | Every dimension and turn in the route has deliberate clearance. |
| Shelf width | Can the planned quantity sit within B? | (outside width × quantity) + planned gaps ≤ usable shelf width |
| Depth | Can the door close without contact? | Product outside depth and protrusions fit within C and clear E. |
| Height | Can the product sit and move normally? | Outside height fits within D with room for lifting, tilting, lids, or drawers. |
| Obstacles | Do F items collide with the product? | The product avoids them or the layout deliberately works around them. |
| Access | Does the organizer improve how the shelf works? | You can see, reach, refill, and remove its contents without creating a new barrier. |
Do not design to exactly zero clearance. Measurements, walls, and manufactured products vary, and a mathematically exact fit can still scrape, bind, or become hard to remove. There is no universal gap that works for every product; choose a deliberate allowance based on measurement confidence, product rigidity, and the movement required.
Worked example: the bin that fits inside but not through the door
What you can try before buying anything
Measurements can reveal that the problem is arrangement rather than a missing product. Before ordering organizers, try one of these reversible tests:
- Group similar items in open cardboard boxes you already have.
- Move frequently used food to the easiest-to-reach shelf.
- Place tall items only where the shelf has its greatest clear height.
- Turn package labels forward and remove expired or unwanted items.
- Use painter's tape to mark the proposed organizer footprint on the shelf.
- Make a cardboard mock-up of the candidate's outside dimensions and test the full insertion and removal path.
The cardboard test is especially useful for a rigid organizer with a tight entry angle. It cannot prove strength, durability, or daily convenience, but it can expose a basic geometry failure before money is spent.
How to judge an organizer listing
Common measuring mistakes
Measuring the pantry as one large box
Organizers occupy individual shelves and must travel through a specific route. Record each target shelf separately.
Measuring with the door open
An open door hides the space taken by hinges, racks, handles, and the door itself. Confirm usable depth and collisions with the door closed gently.
Using internal capacity instead of outside dimensions
A listing's volume or interior size does not tell you the greatest space the product occupies. Fit decisions require full exterior dimensions.
Measuring only once
Check width and depth at more than one point. If the shelf narrows, use the smallest relevant number.
Forgetting quantity and gaps
Three bins that fit individually may not fit side by side. Multiply first, then include the space needed between products and around obstacles.
Treating “technically fits” as “works”
An organizer that scrapes the frame, blocks the door, or must be emptied before removal has failed the practical access test.
Safety and accessibility notes
- Do not stand on a counter, shelf, bin, or other surface that was not designed for climbing. If a shelf cannot be reached from the floor, use an appropriate step stool or ladder according to its instructions, check current recalls, or ask another person to measure it.
- Do not loosen, move, drill, or load a shelf beyond its manufacturer's instructions merely to create organizer clearance.
- Keep the most frequently used items within a comfortable reach when possible. A storage plan that technically fits but requires repeated unsafe reaching is not a usable plan.
- This measuring method checks physical fit. It does not verify shelf strength, mounting safety, food-contact suitability, ventilation, child access, or a product's quality.
The U.S. Consumer Product Safety Commission maintains current ladder and step-stool recall information. The Occupational Safety and Health Administration's portable-ladder safety card also says to follow product markings and use ladders only for their designed purpose.
Frequently asked questions
How much extra space should I leave around a pantry bin?
There is no single correct gap. Leave enough for measurement variation and the actual movement: gripping the bin, pulling it forward, lifting it over a shelf lip, or opening its lid. More rigid products and less certain measurements call for more caution.
What if my pantry walls are not square?
Measure the front, middle, and back. Use the smallest width or depth that the organizer will occupy, and note where the narrowing begins.
Should I trust the dimensions on a product page?
Use them as a starting point, but confirm whether they are exterior dimensions and whether handles, lids, rails, or feet are included. Measure the real product before removing packaging or discarding return materials when practical.
Do I need to measure a doorless pantry?
Yes. A doorless space can still have narrow trim, a shelf lip, an adjacent wall, or a turning angle that controls the insertion path.
What if the shelves are adjustable?
Record the current shelf position and any alternative position you can use without changing the shelf's intended support. Recalculate the clear height of both affected shelves, then follow the cabinet or shelf manufacturer's load and assembly instructions.
Methodology and evidence
Measure your pantry now
Use the free pantry measurement worksheet to record A–F for each shelf and run the product-fit check before buying.
Found a mistake or an uncovered measurement case? Send a correction.