Guides / Solve a pantry problem
How to Organize Deep Pantry Shelves Without Losing Food at the Back
This guide is for a pantry or food cabinet that is deep enough for front packages to hide or block the items behind them. “Deep” is a practical problem, not one fixed number: a shelf is functionally deep when its back cannot be seen or reached during normal use.
Why food disappears on a deep shelf
The shelf may have enough volume and still be hard to use. The failure usually comes from the route to the food:
- front packages block the sight line to the back;
- reaching one item requires removing several unrelated items;
- categories spread sideways and backward as groceries are put away;
- duplicate products are separated, so nobody can see what is already open;
- the shelf is filled to capacity with no space for a hand, label, or movement.
Adding more containers does not automatically solve any of these problems. A container helps only if it changes the retrieval path. The useful question is not “How can I fill this deep shelf?” It is “How will the back come forward?”
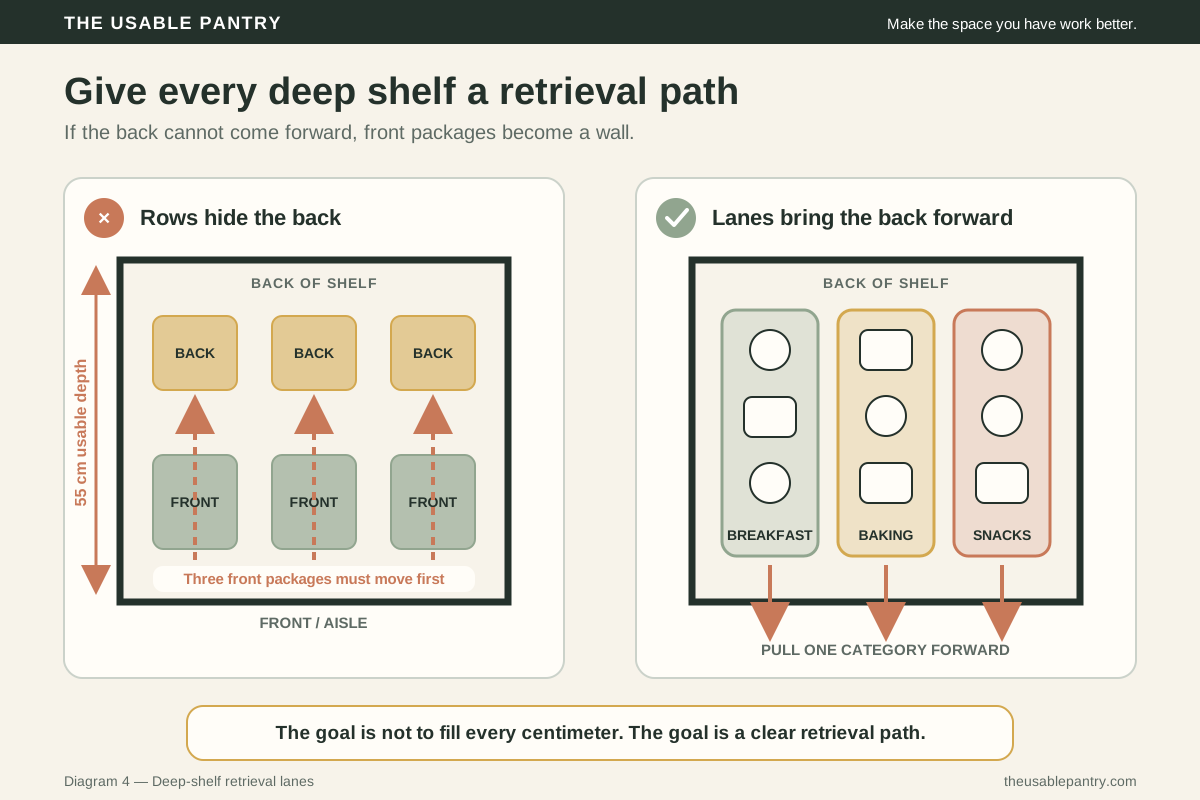 Open diagram full size
 Start with the shelf and the food—not an organizer
Before changing the layout, collect four inputs.
1. Measure the exact shelf
Use the pantry measurement guide and record:
- the narrowest opening;
- inside width;
- usable depth with the door closed;
- smallest clear height;
- hinges and removal clearance; and
- shelf supports, lips, pipes, or other obstacles.
Deep-shelf systems often need to move forward. The product therefore needs to fit not only while resting on the shelf but also while passing the frame, clearing the door, and being pulled out.
2. List what actually belongs there
Write down categories rather than every flavor or brand. A small list might be:
- breakfast;
- pasta and grains;
- canned meals;
- baking;
- snacks; and
- unopened refills.
Do not assign space to food the household rarely buys merely because an organizer photo shows it.
3. Mark frequency
Give each category one of three simple labels:
- Frequent: used most days or several times a week.
- Regular: used weekly or a few times each month.
- Reserve: unopened backup stock or genuinely occasional items.
These are relative to your household. The exact frequency matters less than being honest about what must be easy to reach.
4. Count retrieval steps
A retrieval step is an action required before you can take the intended item.
- 0 steps: the item is directly visible and reachable.
- 1 step: pull one category lane forward, rotate one turntable, or lift one light front tray.
- 2 or more steps: move unrelated packages, unstack several products, or empty a container before reaching the target.
Frequent categories should usually need zero or one simple retrieval step. A reserve item can tolerate more effort if its location is recorded and it does not block something used more often.
The one-movement rule
For food used frequently, aim for zero or one simple setup movement before taking the target item.
- Zero movements: see the item and take it directly.
- One movement: pull one category lane forward, rotate one turntable, or lift one light front tray; then take the item.
- Too many movements: relocate unrelated packages, dismantle a stack, or empty a mixed container before the target becomes reachable.
The rule is about reducing friction, not performing every pantry task in one literal body motion. Opening the pantry door and taking the target are part of normal use. Count the extra actions created by the storage layout.
For example, moving a cereal box, lifting a snack bag, and reaching behind both to find oatmeal creates three unrelated setup movements. Placing breakfast food in one light pull-forward lane changes that route to one setup movement: bring the breakfast category forward, then take the oatmeal.
Do not force a heavy, unstable, or difficult movement merely to achieve a lower count. The intended user still needs to see, grip, control, and return the item. When one movement is unsafe or impractical, relocate the category or choose a different access pattern.
Give the back of the shelf one clear job
The back should do one of three things. Mixing them without a plan recreates the same hidden row.
Job 1: Move forward
Use a lane, tray, basket, or box that contains one category from front to back. When you need a back item, the whole category comes forward as one unit.
This is usually the clearest option for flexible packages, snacks, breakfast items, baking supplies, or other products that would otherwise spread across the shelf.
The tradeoff is weight. A deep container can become difficult to pull when it is filled with cans, jars, or large bags. Test the movement with a cardboard box and a realistic load before buying a rigid bin.
Job 2: Stay visible
Raise a back row on a stable shelf riser when the products are short enough to remain visible and can still be reached safely. This can work for small cans, jars, or boxes with readable labels.
A riser improves the sight line; it does not shorten the shelf. If you can see the back item but cannot reach or remove it without dismantling the front row, the access problem remains.
A turntable is another visibility-and-movement option. It can bring bottles or jars from the back of the circle to the front, but its round footprint leaves unused corners on a rectangular shelf. It earns the space only when rotation actually makes the intended group easier to use.
Job 3: Hold reserve stock
The back can store unopened duplicates or low-frequency items when three rules are met:
- The front item and its refill belong to the same category.
- The reserve location is visible on a label or simple inventory note.
- Reaching it does not require moving several unrelated categories.
“Reserve” should not become a name for forgotten food. Set a reasonable maximum for duplicates and check that zone before adding the item to a shopping list.
Choose the access pattern by the failure you have
| What goes wrong | First pattern to test | Why it may help | When to skip it |
|---|---|---|---|
| Bags and boxes spread front to back | Pull-forward category lane | One group moves as a unit | The filled lane becomes too heavy or catches on the shelf |
| Short cans at the back cannot be seen | Stable shelf riser | Raises the back label above the front row | Reach is still poor or the riser reduces needed clear height |
| Bottles and jars hide behind one another | Turntable | Rotation brings each position forward | The diameter wastes needed corners or bottles fall outside its usable edge |
| Unopened duplicates crowd daily food | Labeled reserve zone | Separates backup quantity from the active item | Nobody checks the reserve zone before shopping |
| Every product is stacked or blocked | Reduce inventory or reassign categories | Creates working room without another product | The shelf contains necessary stock that truly has no alternative home |
| A heavy category must come fully forward | Rated pull-out shelf or drawer | Moves the shelf surface rather than a heavy bin | Installation, load, rental, or cabinet constraints are unresolved |
Start with the least permanent pattern that can solve the problem. A cardboard box can test a lane. Painter's tape can mark a turntable diameter. An upside-down sturdy box can test whether added height improves visibility. These trials are for layout only; they do not make improvised materials suitable for permanent loading or food contact.
A step-by-step deep-shelf reset
Step 1: Remove and group
Take food from one shelf, grouping it by use. Keep package labels and storage instructions visible. Do not mix food that belongs in a refrigerator or freezer into a pantry plan simply because the package is unopened.
USDA describes shelf-stable foods as products that can safely remain at room temperature and notes that some canned products still carry a “Keep Refrigerated” instruction. Follow the package rather than assuming every can, jar, or carton belongs on a pantry shelf. See USDA's shelf-stable food guidance.
Step 2: Remove false categories
Return items that belong elsewhere. Combine duplicates into the same category, but keep all required package information. Do not decant food solely to make the shelf look consistent.
Step 3: Put frequent categories at the easiest positions
Use the shelf front and the most comfortable reach zone for frequent items. Regular categories can occupy the neighboring lanes. Reserve stock can go farther back only with a visible retrieval rule.
Step 4: Build front-to-back lanes
Give each category a clear width from the shelf front toward the back. A lane can be a real bin, an existing box, a tray, or simply a visually defined strip while you test the arrangement.
Keep the category label at the front. Place the item you plan to use next where it is easiest to take. Food date labels do not all mean the same thing, so use package instructions and food-specific guidance rather than treating every printed date as a universal safety deadline. The FDA's food-waste and date-label guide explains the distinction between quality-based labels and food-specific safety guidance. The federal FoodKeeper resource provides storage guidance by food type.
Step 5: Test with the door closed
Pull each lane forward, rotate any turntable, and remove the tallest item. Check the door, hinges, shelf lip, and adjacent containers. A layout has not passed when it works only with the pantry door open or the neighboring lane empty.
Step 6: Live with the test
Use the temporary layout through at least one normal grocery cycle if practical. Notice what migrates, becomes heavy, or is returned to the wrong lane. Those failures tell you more than a staged photograph.
Step 7: Buy only the missing function
If a cardboard lane works but collapses under normal use, a washable rigid bin may be justified. If the riser improves visibility but not reach, buying a prettier riser will not solve the remaining problem. Name the missing function before choosing the product.
Worked example: a 55 cm deep shelf
Product criteria for a deep-shelf system
Common deep-shelf mistakes
Buying identical bins for every category
Snacks, cans, flour bags, and bottles have different shapes and weights. The same container may make one category easy and another unnecessarily heavy.
Filling every centimeter
A shelf needs working space for hands, labels, and movement. Empty space can be part of the system rather than evidence that organization failed.
Using a riser to solve a reach problem
Elevation improves visibility. It does not bring the object closer.
Hiding unrelated items in one deep bin
A large bin can reproduce the original shelf problem inside the container. Categories still need a visible boundary and retrieval rule.
Stacking frequent items
If the product used most often is under several others, every retrieval creates work and makes an unstable pile more likely.
Creating a reserve zone without a limit
Unbounded backup stock expands until labels and counts disappear. Decide how many duplicates the household actually wants to keep.
Ignoring loaded weight
A long bin that slides easily while empty may be difficult to control when full of cans or glass jars. Test the intended load and follow manufacturer limits.
Safety, storage, and accessibility notes
- Keep heavier products in a position that can be reached and controlled without lifting them down from overhead.
- Do not exceed the pantry shelf, riser, bin, drawer, or pull-out manufacturer's load and installation instructions.
- Do not use a temporary cardboard riser or improvised structure as proof of permanent load safety.
- Store only appropriate shelf-stable food in pantry conditions. USDA advises a cool, dry place for canned and other shelf-stable products; follow each package's instructions.
- Keep labels visible when they contain preparation, storage, ingredient, or allergen information needed by the household.
- If reaching the back requires unsafe climbing or body position, use a safer access method, relocate the category, or ask for assistance. Physical shelf capacity does not make an item practically accessible.
For high-shelf access, check current CPSC ladder and step-stool recalls and follow the product markings. OSHA's portable-ladder safety card also advises using a ladder only for its designed purpose.
This guide addresses arrangement and access. It does not determine food safety, shelf strength, mounting safety, accessibility compliance, or a product's quality.
Frequently asked questions
How deep is a “deep” pantry shelf?
There is no universal cutoff in this method. Treat the shelf as deep when its back items cannot be seen, reached, or removed during normal use without moving unrelated products.
Do deep pantry shelves need bins?
No. Labels, category boundaries, lower inventory, and better placement may be enough. A bin is useful when moving the category as one unit solves a tested access problem.
What should go at the back of a pantry?
Use the back for items that can move forward with their category, remain visible on a stable riser, or serve as labeled reserve stock. Avoid placing an untracked frequent item behind unrelated packages.
Is a turntable good for a deep shelf?
Sometimes. It can bring bottles or jars forward by rotation, but it does not use the full rectangular depth and needs enough diameter, height, and edge control. Mark the circle with tape before buying one.
Should pantry bins be clear?
Clear sides can reveal contents; opaque sides can reduce visual noise. Either can work when the front label, category boundary, and retrieval path are clear. Choose based on what the household can identify and maintain, not a universal style rule.
How do I stop buying duplicates?
Keep the active item and its refill in the same category, set a maximum reserve quantity, and check that lane before adding the product to a shopping list.
Methodology and evidence
Your next useful step
If you have not measured the shelf yet, start with How to Measure a Pantry Before Buying Organizers and use the free pantry measurement worksheet.
Found a mistake or an uncovered deep-shelf case? Send a correction.